Deploying OpenShift with Kuryr on a DevStack multi node environment
In this post I will describe the steps I followed to be able to install (with openshift-ansible playbooks), test and play with an OpenShift deployment with Kuryr SDN on top of a developer OpenStack environment built using a DevStack multi node running on 3 VMs. I will cover the next steps:
- Creation of the 3 VMs
- Installation of the Controller Devstack node (it will also be used as worker node)
- Installation of the Compute Devstack nodes
- Creation of needed resources for demo tenant
- Creation of a DNS VM
- Installation of OpenShift with openstack-ansible playbook, with proper inventory configuration
- Log in into the environment and test it
DevStack VMs creation
As said before, we are creating a devstack multi node setup consisting of 3 nodes, in this case VMs – though they could have also been physical servers. As we are installing OpenShift on top of the 3 DevStack VMs, i.e., we will create at least 4 VMs on top of it (master, infra and worker openshift VM nodes plus a DNS VM), we need these DevStack VMs to be big enough. As they would not fit on my laptop, I used my tenant account on an OpenStack based testbed and created there 3 big VMs with the next flavor:
- m1.xlarge: 16GB RAM, 8 VCPUs, 160GB Disk
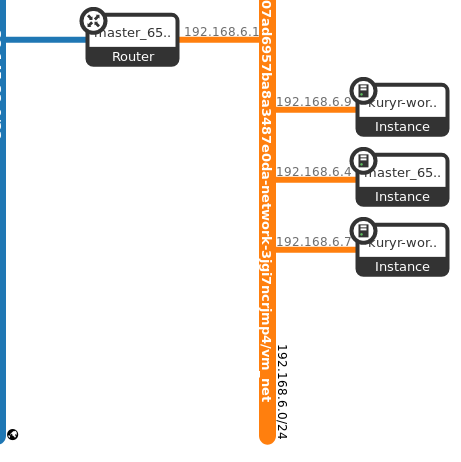
Note I also connected the three VMs to the same neutron network as shown in the next figure:
Controller DevStack Node
Once we have the VMs up and running the next step is to configure the Controller in one of them (in this case the one with IP 192.168.6.4). The first step is to ssh into the Controller VM and clone the devstack git repository:
[controller]$ git clone https://git.openstack.org/openstack-dev/devstack
We then create the devstack configuration file (local.conf) inside the cloned directory:
[controller]$ cd devstack
[controller]$ cat local.conf
[[local|localrc]]
MULTI_HOST=1

# Credentials
ADMIN_PASSWORD=pass
DATABASE_PASSWORD=pass
RABBIT_PASSWORD=pass
SERVICE_PASSWORD=pass
SERVICE_TOKEN=pass
TUNNEL_TYPE=vxlan
# Enable Keystone v3
IDENTITY_API_VERSION=3

enable_plugin heat https://git.openstack.org/openstack/heat
enable_service h-eng h-api h-api-cfn h-api-cw

LIBS_FROM_GIT+=python-octaviaclient
enable_plugin octavia https://git.openstack.org/openstack/octavia
enable_service octavia
enable_service o-api
enable_service o-cw
enable_service o-hm
enable_service o-hk
enable_plugin barbican https://git.openstack.org/openstack/barbican

OCTAVIA_AMP_IMAGE_FILE="/tmp/test-only-amphora-x64-haproxy-centos-7.qcow2"
OCTAVIA_AMP_IMAGE_SIZE=3
OCTAVIA_AMP_IMAGE_NAME="test-only-amphora-x64-haproxy-centos-7"

# Increase Octavia amphorae timeout so that the first LB amphora has time to
# build and boot
IMAGE_URLS+=",http://download.cirros-cloud.net/0.3.4/cirros-0.3.4-x86_64-disk.img"

[[post-config|$OCTAVIA_CONF]]
[controller_worker]
amp_active_retries=9999

[[post-config|$NEUTRON_CONF]]
[DEFAULT]
global_physnet_mtu = 1400

[[post-config|/$Q_PLUGIN_CONF_FILE]]
[securitygroup]
firewall_driver = openvswitch

[[post-config|$NOVA_CONF]]
[scheduler]
discover_hosts_in_cells_interval = 2
In this local.conf file there is a few things to note:
- It enables heat, as it will be later needed by openshift-ansible playbooks
- It enables Octavia components as well as the amphora image that we will use
- It lowers the MTU to 1400 to ensure our nested OpenStack installation will have room for the vxlan headers. This would not be needed if we were using physical servers instead of instances on an OpenStack cloud.
- It ensures Neutron uses the ovs-firewall, as it is needed to properly support Neutron trunk port functionality that Kuryr needs for nested deployments
Next step is to ensure the amphora image is available:
[controller]$ wget https://tarballs.openstack.org/octavia/test-images/test-only-amphora-x64-haproxy-centos-7.qcow2 /tmp/
Finally, we are ready to trigger the controller installation!
[controller]$ ./stack.sh
This command may take some time. Once the installation is completed, the next steps are focused on the installation of the DevStack compute nodes on the other two VMs. But, before that, we may want to check that iptables rules are properly configured and connectivity with the other VMs is not blocked, as well as br-ex OVS bridge is up. In my case I had to execute:
sudo ip link set br-ex up
sudo ip route add 172.24.4.0/24 dev br-ex
sudo ip addr add 172.24.4.1/24 dev br-ex

sudo iptables -A FORWARD -d 172.24.4.0/24 -j ACCEPT
sudo iptables -A FORWARD -s 172.24.4.0/24 -j ACCEPT
sudo iptables -t nat -I POSTROUTING 1 -s 172.24.4.1/24 -j MASQUERADE

sudo iptables -D INPUT -j REJECT --reject-with icmp-host-prohibited
sudo iptables -D FORWARD -j REJECT --reject-with icmp-host-prohibited
Compute DevStack Nodes
The steps to configure the compute nodes are the next:
# Clone the devstack git repo
[compute1]$ git clone https://git.openstack.org/openstack-dev/devstack

# configure local.conf
[compute1]$ cd devstack
[compute1]$ cat local.conf
[[local|localrc]]
ADMIN_PASSWORD=pass
DATABASE_PASSWORD=pass
RABBIT_PASSWORD=pass
SERVICE_PASSWORD=pass
SERVICE_TOKEN=pass
IDENTITY_API_VERSION=3
ENABLED_SERVICES=""

SERVICE_HOST=192.168.6.4   <-- **IP of the CONTROLLER**
MULTI_HOST=1
KEYSTONE_SERVICE_HOST=$SERVICE_HOST
MYSQL_HOST=$SERVICE_HOST
RABBIT_HOST=$SERVICE_HOST

enable_service placement-api
enable_service placement-client

enable_service q-agt
enable_service n-cpu

[[post-config|$NEUTRON_CONF]]
[DEFAULT]
global_physnet_mtu = 1400

[[post-config|/$Q_PLUGIN_CONF_FILE]]
[securitygroup]
firewall_driver = openvswitch
Note that on the compute node we need to point to the controller node and enable the needed Nova (n-cpu) and Neutron components (q-agt). As before, we configure the q-agt to use the ovs-firewall, and we ensure the MTU is in sync with the one at the controller. And then stack it!
[compute1]$ ./stack.sh
Next step is to repeat the above at the other compute node VM (i.e., compute2).
Once both stacks are completed, on the controller node we can check that they compute nodes have been discovered, for instance by listing the existing Neutron agents or the compute service:
[controller]$ source ~/devstack/openrc admin
[controller-admin]$ openstack network agent list
+--------------------------------------+--------------------+------------+-------------------+-------+-------+---------------------------+
| ID                                   | Agent Type         | Host       | Availability Zone | Alive | State | Binary                    |
+--------------------------------------+--------------------+------------+-------------------+-------+-------+---------------------------+
| 4b528122-4672-49dc-aa83-2d1b508be561 | Open vSwitch agent | compute2   | None              | :-) | UP | neutron-openvswitch-agent      |
| 4faa99dc-2cc6-4c15-923c-643dd496beff | DHCP agent         | controller | nova              | :-) | UP | neutron-dhcp-agent             |
| 56692ae8-aec1-4fda-9912-eacbbc7a884b | Open vSwitch agent | controller | None              | :-) | UP | neutron-openvswitch-agent      |
| 61774b67-4021-414d-ba36-63f4c540ae93 | Metadata agent     | controller | None              | :-) | UP | neutron-metadata-agent         |
| 836aab61-6cf3-497d-8dd3-63a665f82386 | Open vSwitch agent | compute1   | None              | :-) | UP | neutron-openvswitch-agent      |
| a6e1aa7a-39dc-4c36-aa21-b2073561cc1d | L3 agent           | controller | nova              | :-) | UP | neutron-l3-agent               |
+--------------------------------------+--------------------+------------+-------------------+-------+-------+---------------------------+
[controller-admin]$ openstack compute service list
+----+------------------+------------+----------+---------+-------+----------------------------+
| ID | Binary           | Host       | Zone     | Status  | State | Updated At                 |
+----+------------------+------------+----------+---------+-------+----------------------------+
| 2 | nova-scheduler    | controller | internal | enabled | up    | 2018-05-25T14:24:49.000000 |
| 4 | nova-consoleauth  | controller | internal | enabled | up    | 2018-05-25T14:24:53.000000 |
| 5 | nova-conductor    | controller | internal | enabled | up    | 2018-05-25T14:24:52.000000 |
| 1 | nova-conductor    | controller | internal | enabled | up    | 2018-05-25T14:24:52.000000 |
| 3 | nova-compute      | controller | nova     | enabled | up    | 2018-05-25T14:24:55.000000 |
| 4 | nova-compute      | compute2   | nova     | enabled | up    | 2018-05-25T14:24:54.000000 |
| 5 | nova-compute      | compute1   | nova     | enabled | up    | 2018-05-25T14:24:56.000000 |
+----+------------------+------------+----------+---------+-------+----------------------------+
Creating resources for demo tenant (controller node)
We need the Trunks Port functionality from Neutron, so we need to ensure it is enabled at neutron.conf configuration file by include ‘trunk’ at the service_plugins:
[controller]$ cat /etc/neutron/neutron.conf | grep service_plugins
service_plugins = neutron.services.l3_router.l3_router_plugin.L3RouterPlugin,lbaasv2,**trunk**
After adding it, we need to restart the Neutron server:
sudo systemctl restart devstack@q-svc.service
Next, we log in as admin tenant and create the flavors we will use, remove the quota limitations for the demo tenant, and import the OS image to use for the OpenShift VM nodes:
# Log in with admin credentials
[controller]$ source ~/devstack/openrc admin

# Download and import CentOS 7 cloud image
[controller-admin]$ wget http://cloud.centos.org/centos/7/images/CentOS-7-x86_64-GenericCloud.qcow2
[controller-admin]$ openstack image create --container-format bare --disk-format qcow2 --file CentOS-7-x86_64-GenericCloud.qcow2 centos7

# Remove quota limitations
[controller-admin]$ openstack quota set --ram -1 --cores -1 --secgroups -1 --secgroup-rules -1 --instances -1 --ports -1 demo

# Create 2 new flavors
[controller-admin]$ openstack flavor create --ram 4096 --disk 20 --vcpus 4 m1.medium2
[controller-admin]$ openstack flavor create --ram 2048 --disk 10 --vcpus 1 m1.small2
Finally, as the demo tenant user, we create the key that will be injected into the OpenShift VM nodes:
[controller]$ source ~/devstack/openrc demo
[controller-demo]$ openstack keypair create --public-key ~/.ssh/id_rsa.pub openshift
Create DNS server VM
Once we have the DevStack multi-node ready to be used we create a docker container from where we will trigger the openshift-ansible playbook, so that we can safely install dependencies. In addition, we need to copy both our key as well as a file defining the env vars for the demo tenant credentials:
[controller]$ sudo yum install -y docker && sudo systemctl start docker
[controller]$ cp -r .ssh ssh_copy
# create credentials file
[controller]$ cat keystonerc
unset OS_SERVICE_TOKEN
export OS_USERNAME=demo
export OS_PASSWORD='pass'
export PS1='[\u@\h \W(keystone_demo)]\$ '
export OS_AUTH_URL=http://192.168.6.4/identity
export OS_PROJECT_NAME=demo
export OS_USER_DOMAIN_ID=default
export OS_PROJECT_DOMAIN_ID=default
export OS_IDENTITY_API_VERSION=3

# Start container
[controller]$ sudo docker run -it -v ~/ssh_copy:/mnt/.ssh:Z  -v $PWD/keystonerc:/root/.config/openstack/keystonerc.sh:Z  redhatcop/control-host-openstack bash
[root@11ceecccb5f3 ~(keystone_demo)]#  <-- **INSIDE OF THE CONTAINER**

# Update container ansible and shade versions
[root@11ceecccb5f3 ~(keystone_demo)]# pip install -U ansible shade
After the container is updated, we execute a playbook to create a VM that serves as a DNS server. We use a playbook created by Tomas Sedovic:
# Clone devns repo
[root@11ceecccb5f3 ~(keystone_demo)]# git clone https://github.com/tomassedovic/devns.git

# Edit vars.yaml file
[root@11ceecccb5f3 ~(keystone_demo)]# cd devns
[root@11ceecccb5f3 ~(keystone_demo)]# cat vars.yaml
---
# NOTE: this must correspond to the domain you use for remote access.
# In case of openshift-ansible, the default is "openshift.example.com" but if
# you change it, you must change the value here as well!
dns_domain: openshift.example.com
# openstack network list
# NOTE: this is the network serving Floating IP addresses. It's often called
# `external`, `public` or `ext-net`.
external_network: public
key_name: openshift
image: centos7
flavor: m1.small2
server_name: openshift-dns
dns_forwarders: [8.8.8.8]

# Trigger the playbook
[root@11ceecccb5f3 ~(keystone_demo)]# ansible-playbook --private-key ~/.ssh/id_rsa --user centos deploy.yaml -e @vars.yaml
When the playbook execution is completed, a VM has been created, named openshift-sdn, and something like the next are output (we need to keep this information as we will need it for the openshift-ansible inventory file):
...
ok: [172.24.4.3 -> 172.24.4.3] => {
   "nsupdate_keys": {
       "public-openshift.example.com": {
           "key_algorithm": "HMAC-SHA256",
           "key_secret": "XXXXXXXXXXXXXXXX"
       }
   }
}
...
Install OpenShift with OpenShift-Ansible and Kuryr SDN
Next step is to deploy the OpenShift cluster by using the openshift-ansible playbooks. We need to clone the repository inside the above created container, as well as to prepare the inventory files:
# Clone the openshift-ansible repo
[root@11ceecccb5f3 ~(keystone_demo)]# git clone https://github.com/openshift/openshift-ansible

# Copy the default ansible config and inventory
[root@11ceecccb5f3 ~(keystone_demo)]# cp -r openshift-ansible/playbooks/openstack/sample-inventory/ inventory
[root@11ceecccb5f3 ~(keystone_demo)]# cp openshift-ansible/ansible.cfg ansible.cfg
As we are going to deploy OpenShift ansible with Kuryr SDN, we need to uncomment and configure a few vars at the default inventory file, as well as adding information about the DNS VM. The resulting all.yaml inventory file is the next:
[root@11ceecccb5f3 ~(keystone_demo)]# cat inventory/group_vars/all.yml
---
openshift_openstack_clusterid: "openshift"
openshift_openstack_public_dns_domain: "example.com"
# Add floating IP of the DNS VM
openshift_openstack_dns_nameservers: ["172.24.4.3"]

openshift_openstack_keypair_name: "openshift"
openshift_openstack_external_network_name: "public"

# KURYR related configuration
## You should set the following if you want to use Kuryr/Neutron as your SDN
openshift_use_kuryr: True
openshift_use_openshift_sdn: False
use_trunk_ports: True
os_sdn_network_plugin_name: cni
openshift_node_proxy_mode: userspace

# NOTE: you must uncomment these for Kuryr to work properly as well:
openshift_master_open_ports:
- service: dns tcp
  port: 53/tcp
- service: dns udp
  port: 53/udp
openshift_node_open_ports:
- service: dns tcp
  port: 53/tcp
- service: dns udp
  port: 53/udp

#Disable management of the OpenShift Registry
openshift_hosted_manage_registry: false

# # Kuryr needs to know the network or the subnet you will be taking Floating
# IPs for the loadbalancer services from.
kuryr_openstack_public_net_id: c566502b-df36-4803-95e1-93a99c41746b

## You can pre-populate the pools with subports by uncommenting the next line
## and specifying the amount of subports you want to pre-create per
## origin-node, e.g.: openshift_kuryr_precreate_subports: 5
openshift_kuryr_precreate_subports: 5

# Image to use for the VM nodes
openshift_openstack_default_image_name: "centos7"

# Number of nodes of each type:
openshift_openstack_num_masters: 1
openshift_openstack_num_infra: 1
openshift_openstack_num_cns: 0
openshift_openstack_num_nodes: 1

# Flavor of the VM nodes
openshift_openstack_default_flavor: "m1.medium2"

openshift_openstack_docker_volume_size: "15"

# The Classless Inter-Domain Routing (CIDR) for the OpenStack VM subnet.
openshift_openstack_subnet_cidr: "192.168.99.0/24"
# The starting IP address for the OpenStack subnet allocation pool.
openshift_openstack_pool_start: "192.168.99.3"
# The ending IP address for the OpenStack subnet allocation pool.
openshift_openstack_pool_end: "192.168.99.254"

#Configuration regarding DNS VM **(the one we copied from the devns playbook execution)**
openshift_openstack_public_hostname_suffix: "-public"

openshift_openstack_external_nsupdate_keys:
 public:
   key_secret: 'XXXXXXXXXXXXXXXXXXX'
   key_algorithm: 'hmac-sha256'
   server: '172.24.4.3'
   key_name: 'public-openshift.example.com'
 private:
   key_secret: 'XXXXXXXXXXXXXXXXXXX'
   key_algorithm: 'hmac-sha256'
   server: '172.24.4.3'
   key_name: 'public-openshift.example.com'

# NOTE(shadower): Do not change this value. The Ansible user is currently
# hardcoded to `openshift`.
ansible_user: openshift

# If you want to use the VM storage instead of Cinder volumes, set this to `true`.
# NOTE: this is for testing only! Your data will be gone once the VM disappears!
openshift_openstack_ephemeral_volumes: true

# # OpenShift node labels
openshift_openstack_cluster_node_labels:
 app:
   region: primary
   pod_vif: nested-vlan
 infra:
   region: infra
   pod_vif: nested-vlan

## cloud config
openshift_openstack_disable_root: true
openshift_openstack_user: openshift
For the OpenShift specific vars (OSEv3.yml) we also need to update some information:
[root@11ceecccb5f3 ~(keystone_demo)]# cat inventory/group_vars/OSEv3.yml
---
#Disable some services that we don't need
openshift_enable_service_catalog: false
template_service_broker_install: false
openshift_web_console_install: false

# ensure the right release is installed, also including some additional repos
openshift_deployment_type: origin
openshift_release: v3.10
openshift_additional_repos:
- id: origin-repo
  name: origin-rpms
  baseurl: https://storage.googleapis.com/origin-ci-test/logs/test_branch_origin_extended_conformance_gce/3053/artifacts/rpms
  enabled: 1
  gpgcheck: 0

# Disable some checks that may fail due to the small/nested env
openshift_disable_check: disk_availability,memory_availability,docker_storage,package_availability,package_version

# other default values
openshift_master_default_subdomain: "apps.."
openshift_master_cluster_public_hostname: "console.."
osm_default_node_selector: 'region=primary'
openshift_hosted_router_wait: True
openshift_hosted_registry_wait: True
openshift_hostname_check: false
ansible_become: true
And finally, just trigger the playbook and go for a coffee!
[root@11ceecccb5f3 ~(keystone_demo)]# ansible-playbook -vvv --user openshift \
 -i openshift-ansible/playbooks/openstack/inventory.py \
 -i inventory \
 openshift-ansible/playbooks/openstack/openshift-cluster/provision_install.yml
Test installation
If the playbook execution finished successfully, we can test ieverything is working by logging into the created OpenShift master VM:
[root@11ceecccb5f3 ~(keystone_demo)]# openstack server list
+--------------------------------------+------------------------------------+--------+-----------------------------------------------------------------------+------------+
| ID                                   | Name                               | Status | Networks                                                              | Image Name |
+--------------------------------------+------------------------------------+--------+-----------------------------------------------------------------------+------------+
| 54cde7bc-c4b4-4a16-82be-62740a9a7abd | master-0.openshift.example.com     | ACTIVE | openshift-ansible-openshift.example.com-net=192.168.99.9, 172.24.4.4  | centos7    |
| a6a64048-b142-4114-8925-c77ac72a95c3 | infra-node-0.openshift.example.com | ACTIVE | openshift-ansible-openshift.example.com-net=192.168.99.7, 172.24.4.11 | centos7    |
| 77ac85d6-ccfd-4a0f-b1f5-b311ed444b23 | app-node-0.openshift.example.com   | ACTIVE | openshift-ansible-openshift.example.com-net=192.168.99.6, 172.24.4.13 | centos7    |
| 1bd29aa7-7183-4b5c-a999-47488392cb28 | openshift-dns                      | ACTIVE | openshift-dns=192.168.23.12, 172.24.4.3                               | centos7    |
+--------------------------------------+------------------------------------+--------+-----------------------------------------------------------------------+------------+
[root@11ceecccb5f3 ~(keystone_demo)]# ssh openshift@172.24.4.4
[openshift@master-0 ~]$
And then checking the nodes are Ready, as well as the system pods Running:
[openshift@master-0 ~]$ oc get nodes
NAME                                 STATUS   ROLES           AGE   VERSION
app-node-0.openshift.example.com     Ready    compute         1d    v1.10.0+b81c8f8
infra-node-0.openshift.example.com   Ready    compute,infra   1d    v1.10.0+b81c8f8
master-0.openshift.example.com       Ready    master          1d    v1.10.0+b81c8f8
[openshift@master-0 ~]$ oc get pods --all-namespaces

NAMESPACE         NAME                                               READY  STATUS   RESTARTS  AGE
default           router-1-nlw49                                     1/1    Running  0         1d
kube-system       master-api-master-0.openshift.example.com          1/1    Running  0         1d
kube-system       master-controllers-master-0.openshift.example.com  1/1    Running  0         1d
kube-system       master-etcd-master-0.openshift.example.com         1/1    Running  0         1d
openshift-infra   kuryr-cni-ds-8ss96                                 1/1    Running  0         1d
openshift-infra   kuryr-cni-ds-hq6sh                                 1/1    Running  0         1d
openshift-infra   kuryr-cni-ds-z8k24                                 1/1    Running  0         1d
openshift-infra   kuryr-controller-5f668b8f79-m8pkm                  1/1    Running  0         1d
openshift-node    sync-92f9n                                         1/1    Running  1         1d
openshift-node    sync-hz6zt                                         1/1    Running  1         1d
openshift-node    sync-vcmmh                                         1/1    Running  1         1
We can also check the status of kuryr-cni or kuryr-controller with:
oc -n openshift-infra logs -f kuryr-controller-5f668b8f79-m8pkm
Finally, we can test everything works as expected by creating a demo deployment with its service and by checking the connectivity:
[openshift@master-0 ~]$ oc new-project test
Now using project "test" on server "https://192.168.99.9:8443".
You can add applications to this project with the 'new-app' command. For example, try:
oc new-app centos/ruby-22-centos7~https://github.com/openshift/ruby-ex.git
to build a new example application in Ruby.

[openshift@master-0 ~]$ oc run --image kuryr/demo demo
deploymentconfig "demo" created

[openshift@master-0 ~]$ oc scale dc/demo --replicas=3
deploymentconfig.apps.openshift.io "demo" scaled

[openshift@master-0 ~]$ oc expose dc/demo --port 80 --target-port 8080
service "demo" exposed

[openshift@master-0 ~]$ oc get pods -o wide
NAME          READY  STATUS   RESTARTS  AGE  IP          NODE
demo-1-4c6wp  1/1    Running  0         1m   10.11.0.12  app-node-0.openshift.example.com
demo-1-rt9zk  1/1    Running  0         1m   10.11.0.4   app-node-0.openshift.example.com
demo-1-zr7d6  1/1    Running  0         1m   10.11.0.6   app-node-0.openshift.example.com
[openshift@master-0 ~]$ oc get svc
NAME  TYPE       CLUSTER-IP      EXTERNAL-IP  PORT(S)  AGE
demo  ClusterIP  172.30.152.244  <none>       80/TCP   1m

[openshift@master-0 ~]$ curl 172.30.152.244
demo-1-4c6wp: HELLO! I AM ALIVE!!!
[openshift@master-0 ~]$ curl 172.30.152.244
demo-1-zr7d6: HELLO! I AM ALIVE!!!
[openshift@master-0 ~]$ curl 172.30.152.244
demo-1-rt9zk: HELLO! I AM ALIVE!!!