OVN-BGP Agent: Testing Setup
The basis of the OVN-BGP Agent was explained in a previous blog post. This blog post will cover how to set up a testing environment where you can play with the OVN-BGP Agent.
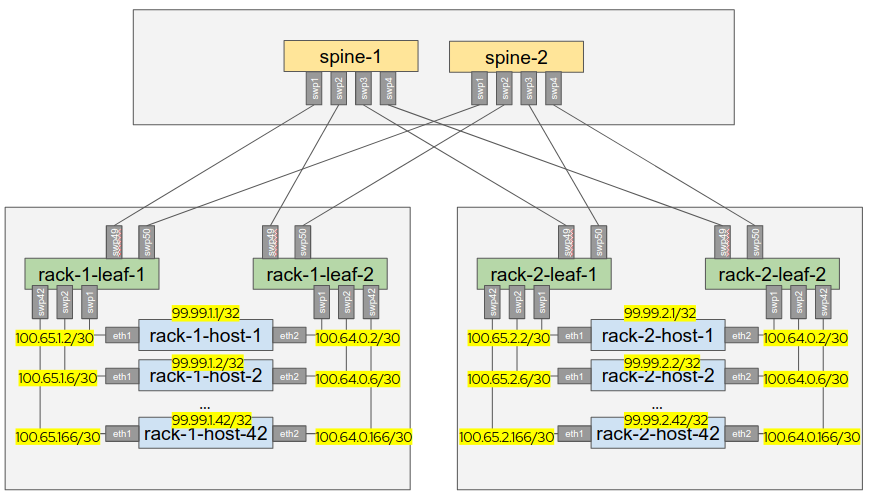
The physical topology consists of a spine-leaf architecture where each server has Layer-2 connectivity to the leafs on the rack they are connected to. BGP will be running on the fabric, i.e. servers, leafs and spines. Each server will be connected to two leafs for both high availability and load balancing. This is accomplished by Equal-Cost Multi-Path (ECMP), a routing technique for routing packets along multiple paths of equal cost. Note this is not a hard requirement and traditional use of bonded NICs should work just fine ensuring that the directly connected routes are advertised through the correct network.
We use devstack to deploy OpenStack on the rack-X-host-Y, being rack-1-host-1 our controller node, and the rest (rack-1-host-2, rack-2-host-1 and rack-2-host-2) our computes nodes.
Deploy Spine Leaf Topology
First, we deploy the VMs. To do so we use the vagrants present at https://github.com/luis5tb/vagrants/tree/spine-leaf-cumulus (branch spine-leaf-cumulus). There are different folders there, but we use the one named “spine-leaf-test”. So the initial steps to create the VMs that are connected as in the above figure (but with only 2 hosts per rack) are the next:
$ git clone https://github.com/luis5tb/vagrants.git
$ git checkout spine-leaf-cumulus
$ cd spine-leaf-test
$ vagrant up
After a few minutes we have the VMs ready to be used and configured. Note the spine/leaf VMs take quite some time to be ready, so be patient!
Configure BGP
Let’s configure BGP on each of the nodes. The spines belong to AS number 6500, while the rest (leafs and hosts) belong to AS 6499. For simplicity we are only going to show the IPv4 configuration, but the IPv6 is almost identical. In addition, we use BGP unnumbered. Traditionally, since the BGP protocol runs on TCP/IP, each BGP peer has to be configured with an IPv4 address. In large networks, this can pose a maintenance and scalability challenge as this can consume a lot of IPv4 address spacing. To overcome this problem, unnumbered BGP (RFC 5549) can be used to discover the peer routers that are attached point-to-point by parsing IPv6 Router Advertisements (RA). Each router periodically broadcasts a RA message with its IPv6 link-local address and MAC address. On the other end of the wire, the BGP neighbor receives this information and parses the contents to set up peering. With the BGP peering session now established over IPv6, exchanged route prefixes can of both IPv4 and IPv6 address family types.
Spines
To configure the spine, we need to ssh into each one of the spine and execute the next:
$ vagrant ssh spine-X
$ net add interface swp1,swp2,swp3,swp4
$ net commit  # (wait for it to complete, it will take several minutes)
$ net add bgp autonomous-system 65000
$ net add bgp router-id 99.97.1.X # (where X is the spine number, 1 or 2)
$ net add loopback lo ip address 99.97.1.X/32
$ net add bgp neighbor swp1 interface remote-as 64999
$ net add bgp neighbor swp2 interface remote-as 64999
$ net add bgp neighbor swp3 interface remote-as 64999
$ net add bgp neighbor swp4 interface remote-as 64999
$ net add bgp redistribute connected
$ net commit
Leafs
For the leafs the configuration is a bit different. They need to connect to the spines but also to the hosts, and they also work as router reflectors for the hosts. So the steps are the next:
$ vagrant ssh rack-X-leaf-Y  # Where X is the rack number and Y the leaf
$ net add interface swp1,swp2,swp49,swp50
$ net commit # (wait for it to complete, it will take several minutes)
$ net add bgp autonomous-system 64999
$ net add bgp router-id 99.98.X.Y
$ net add loopback lo ip address 99.98.X.Y/32
$ net commit
$ # defining peers
$ net add bgp neighbor swp49 interface remote-as 65000  # to spine
$ net add bgp neighbor swp50 interface remote-as 65000  # to spine
$ net add bgp neighbor swp49 allowas-in origin
$ net add bgp neighbor swp50 allowas-in origin
$ net add bgp neighbor swp1 interface remote-as 64999  # to hosts
$ net add bgp neighbor swp2 interface remote-as 64999  # to hosts
$ net add bgp neighbor swp1 route-reflector-client
$ net add bgp neighbor swp2 route-reflector-client
$ net add bgp neighbor swp1 next-hop-self force
$ net add bgp neighbor swp2 next-hop-self force
$ net add bgp neighbor swp1 default-originate
$ net add bgp neighbor swp2 default-originate
$ net add bgp redistribute connected
$ net commit
Finally, we also need to configure swp1 and swp2 IPs for their connectivity with the hosts, as shown in the figure, with a /30 separate network for each one. For rack-X-leaf1 it should be:
$ sudo ip addr add 100.65.X.1/30 dev swp1
$ sudo ip addr add 100.65.X.5/30 dev swp2
And for rack-X-leaf2 it should be:
$ sudo ip addr add 100.64.0.1/30 dev swp1
$ sudo ip addr add 100.64.0.5/30 dev swp2
Hosts
For the hosts that will form the OpenStack deployment, the configuration is a quite different as they are not based on the vagrant cumulus-vx image but on centos/8 image. The steps are the next:
- Install FRR and ensure proper daemons configuration:
$ sudo yum install -y frr
# Ensure zebra and bgpd daemons are enabled
$ sudo sed -e '/^\(zebra\|bgpd\)=/s/no/yes/' -i /etc/frr/daemons
# Ensure VRFWNETNS is enabled at the zebra options
$ cat /etc/frr/daemons | grep zebra_options
zebra_options=("-A 127.0.0.1 --vrfwnetns")
- Configure FRR at /etc/frr/frr.conf, where X, Y are the rack and host number respectively:
$ sudo su
# cat > /etc/frr/frr.conf <<EOF
frr version 7.0
frr defaults traditional
hostname worker1
no ipv6 forwarding
!
router bgp 64999
 bgp router-id 99.99.X.Y
 bgp log-neighbor-changes
 neighbor eth1 interface remote-as 64999
 neighbor eth2 interface remote-as 64999
 !
 address-family ipv4 unicast
  redistribute connected
  neighbor eth1 prefix-list only-host-prefixes out
  neighbor eth1 allowas-in origin
  neighbor eth2 prefix-list only-host-prefixes out
  neighbor eth2 allowas-in origin
 exit-address-family
!
ip prefix-list only-default permit 0.0.0.0/0
ip prefix-list only-host-prefixes permit 0.0.0.0/0 ge 32
!
ip protocol bgp route-map out_32_prefixes
!
route-map out_32_prefixes permit 10
 match ip address prefix-list only-default
 set src 99.99.X.Y
!
line vty
!
EOF
- Then, as in the leafs, we need to configure the IPs on the nics connected to the leafs, as well as the loopback IP:
$ sudo ip addr add 99.99.X.Y/32 dev lo
$ sudo ip addr add 100.65.X.Z/30 dev eth1  # Where Z = 2+4*(y-1), i.e 2 for host1, 6 for host 2, ...
$ sudo ip addr add 100.64.0.Z/30 dev eth2
- And enable FRR:
$ sudo systemctl enable frr
$ sudo systemctl start frr
Deploy Devstack
Controller (rack-1-host-1)
We deploy the OpenStack controller with DevStack in rack-1-host-1. We just need to modify “/vagrant/utils/common-functions” so that “ip=${!hostname}” is pointing to the rack-1-host-1 loopback IP:
ip=99.99.1.1 # loopback ip of the controller
Then we create a script to trigger the devstack installation:
cat > controller.sh <<EOF
#!/usr/bin/env bash
set -x
source /vagrant/utils/common-functions
install_devstack master

sleep 60

# br-ex configuration
sudo ovs-vsctl del-br br-ex
sudo ovs-vsctl add-br br-ex
sudo ip l s dev br-ex up
sudo ip a a 1.1.1.1/32 dev br-ex

# set the kernel flags
sudo sysctl -w net.ipv4.conf.all.rp_filter=0
sudo sysctl -w net.ipv4.conf.br-ex.proxy_arp=1
sudo sysctl -w net.ipv4.ip_forward=1
# for ipv6 the next are needed
# sudo sysctl -w net.ipv6.conf.br-ex.proxy_ndp=1
# sudo sysctl -w net.ipv6.all.forwarding=1

# configure node as gateway node
sudo ovs-vsctl set open . external-ids:ovn-bridge-mappings="public:br-ex"
sudo ovs-vsctl set open . external-ids:ovn-cms-options="enable-chassis-as-gw"
EOF
And execute the script and wait for the devstack installation to complete:
$ chmod +x controller.sh
$ ./controller.sh
We need to ensure that the default route is using the leafs. For rack-X-host-1 should be the next:
$ sudo ip route a 0.0.0.0/0 src 99.99.X.1 nexthop via 100.65.X.1 dev eth1 nexthop via 100.64.0.1 dev eth2
And for rack-X-host-2 the next:
$ sudo ip route a 0.0.0.0/0 src 99.99.X.2 nexthop via 100.65.X.5 dev eth1 nexthop via 100.64.0.5 dev eth2
Note this actually belongs to the configuration of the rack-X-host-X BGP, but, as we don’t have the spines connected to the Internet, and we require devstack to download several repositories to complete its installation, we need to use the default vagrant interface as the default route during the installation.
Finally, we want to enable DVR on OVN on the neutron server, so we need to ensure that /etc/neutron/plugins/ml2/ml2_conf.ini contains the next:
enable_distributed_floating_ip = True
And if not, add it and restart the neutron server:
$ sudo systemctl restart devstack@q-svc
Computes
Once the controller is installed we can proceed with the computes. The process is very similar, with just a few exceptions. We also need to modify “/vagrant/utils/common-functions”:
ip=99.99.X.Y # loopback ip of the compute
Then we create a script to trigger the devstack installation:
cat > compute.sh <<EOF
#!/usr/bin/env bash
set -x
source /vagrant/utils/common-functions
install_devstack slave 99.99.1.1  # pointing to controller loopback ip

sleep 60

# br-ex configuration
sudo ovs-vsctl del-br br-ex
sudo ovs-vsctl add-br br-ex
sudo ip l s dev br-ex up
sudo ip a a 1.1.1.1/32 dev br-ex

# set the kernel flags
sudo sysctl -w net.ipv4.conf.all.rp_filter=0
sudo sysctl -w net.ipv4.conf.br-ex.proxy_arp=1
sudo sysctl -w net.ipv4.ip_forward=1
# for ipv6 the next are needed
# sudo sysctl -w net.ipv6.conf.br-ex.proxy_ndp=1
# sudo sysctl -w net.ipv6.all.forwarding=1

# configure node as gateway node
# comment out this lines if you don’t want the compute to be gateway nodes
sudo ovs-vsctl set open . external-ids:ovn-bridge-mappings="public:br-ex"
sudo ovs-vsctl set open . external-ids:ovn-cms-options="enable-chassis-as-gw"
EOF
And execute the script and wait for the devstack installation to complete:
$ chmod +x compute.sh
$ ./compute.sh
And finally ensure that the default route is using the leafs. For rack-X-host-1 should be the next:
$ sudo ip route a 0.0.0.0/0 src 99.99.X.1 nexthop via 100.65.X.1 dev eth1 nexthop via 100.64.0.1 dev eth2
And for rack-X-host-2 the next:
$ sudo ip route a 0.0.0.0/0 src 99.99.X.2 nexthop via 100.65.X.5 dev eth1 nexthop via 100.64.0.5 dev eth2
Again, this belongs to the configuration of the rack-X-host-X BGP, but, as we don’t have the spines connected to the Internet, and we require devstack to download several repositories to complete its installation, we need to use the default vagrant interface as the default route during the installation.
Possible devstack issues
Due to devstack using master branches of openstack components, there may be some issues when installing. For instance, at the time of writing this blog post I had to manually install the next packages:
$ sudo yum install python3-devel openssl-devel python3-six python3-systemd python3-libvirt httpd wget git memcached dstat -y
And ensure the libvirt-python installed version matches with the one installed by editing /opt/stack/requirements/upper-constraints.txt and setting it to 6.10.0.
OVN-BGP Agent
Installing and running the OVN-BGP-Agent is straightforward. It needs to run on each OpenStack node, and you need to ensure there is a routing table associated with the OVS provider(s) bridge. For instance, assuming ‘br-ex’ as the default one, the next should be executed:
$ sudo su
$ echo 200 br-ex >> /etc/iproute2/rt_tables
Note you can check the bridge mappings with:
$ sudo ovs-vsctl list open . | grep ovn-bridge-mappings
... ovn-bridge-mappings="public:br-ex"...
Then, installation and execution of the daemon is as simple as:
$ git clone https://github.com/luis5tb/bgp-agent.git
$ python setup.py install
$ sudo bgp-agent
Starting BGP Agent...
Loaded chassis 51c8480f-c573-4c1c-b96e-582f9ca21e70.
BGP Agent Started...
Ensuring VRF configuration for advertising routes
Configuring br-ex default rule and routing tables for each provider network
Found routing table for br-ex with: ['200', 'br-ex']
Sync current routes.
For a more in-depth description of the traffic flows in this environment you can check the follow-up blog post: OVN BGP Agent: In-depth traffic flow inspection